We are all aware of the fact that Dynamics 365 Finance and Supply Chain is the cloud evolution of Dynamics AX. Therefore, reporting has completely changed, and business users need a new process and steps to ensure electronic reporting success. However, there are different ways to use electronic reporting for each module, from Power BI to Office 365, so you will need a separate method.
This short guide takes you on a simple journey of Dynamics 365 electronic reporting and talks about the process in detail.
What is Electronic Reporting in D365?
One D365 F&O reporting feature that goes beyond simple reports is Electronic Reporting. Additionally, reporting in Dynamics 365 finance & operations offers data interchange capabilities like bank statement import and file upload/export. Microsoft offers an inventory of frequently used file formats. A repository is built as a structure for updated formats.
The user interface frequently has settings that can be selected to cause an electronic report to appear on a menu. Typically, an export of a balance sheet or viewer format, such as Microsoft Excel or PDF, is provided for the electronic report.

How to do Model mapping?
You need to have a data model to get started with financial reports in d365 f&o. Once you have it, map it to Dynamics 365 financial data using model mappings. These mappings connect your model to tables, values, labels, or calculations.
Make multiple mappings for different needs, each targeting specific parts of your model.
You need to define the output/input file format for the format. Set file type, structure, delimiters, fields, and field properties.
Example:
Create a simple CSV file with header/line indicators. To check it out, Add elements and try calculated fields.
How to create a model?
- Go to the Electronic reporting configurations form and select "Create configuration."
- Choose "Root" and name it (e.g., "Client Bills") with a description if desired.
- Ensure the provider is filled automatically based on your active configuration provider setup.
- Click "Create configuration" at the bottom.
Build the model:
- A new root configuration is generated.

- Click "Designer" to access the model form, which will be initially empty.
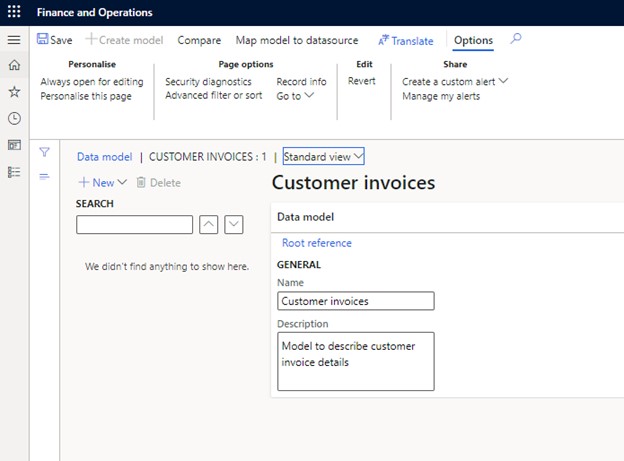
- Click "New" to add a model element. Since it's empty, there's only one option: "Model root."
- Label the root node (e.g., "Billing model") and click "Add."
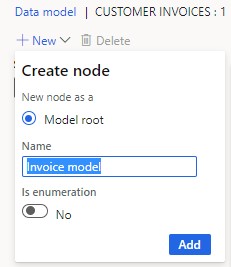
Customize nodes:
- Choose "New" with the root node selected; now you'll have an extra option.
- Select "Child of an active node" and name it (e.g., "Bills") to define invoice lists.
- Choose "Record list" from the item type drop-down.
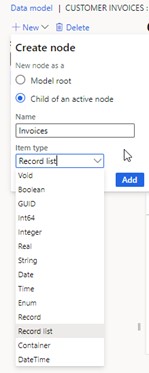
- Repeat for each invoice item: Select "Child of an active node," choose "Record" as the item type, and name it accordingly.
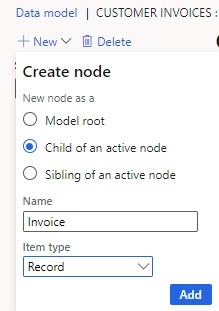
Design invoice details:
- Add header fields: Select "New," choose "Child," name it (e.g., "Customer number"), and select the data type.
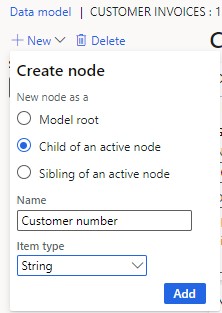
- Continue adding fields for Invoice number, Invoice date, and Invoice amount.
- Ensure nodes are in alphabetical order, though it's not crucial for now.
- Next, create invoice lines: Add a child from the Invoice node with the type "Record list" named "Invoice lines."
- Create subsequent nodes for each detail: Child for Invoice lines, Child for Invoice line, and siblings for Item, Description, Quantity, Unit price, and Line amount.
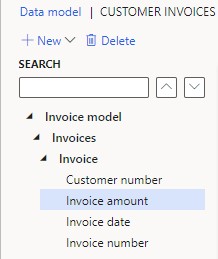
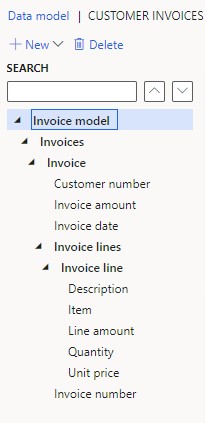
Finalize and save:
- Save your model and return to the previous screen.
- Change the status to "Complete" to use the model with other elements.
- Save regularly, especially for complex models, to prevent business data loss.

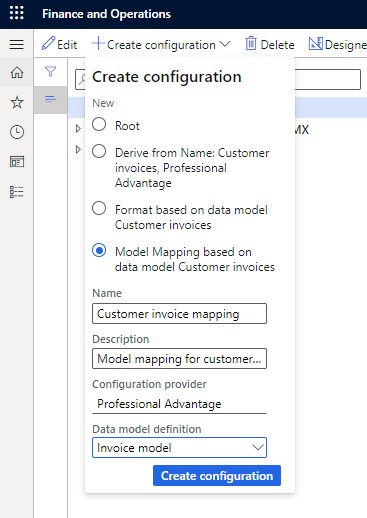
How to create a model mapping?
- Choose the "Customer invoices" data model and press "Create configuration."
- Opt for model mapping creation.
- Provide a name and description for the mapping.
- Specify the data model definition; select the appropriate root node if applicable.
- Click "Create configuration."

Mapping Design:
- Access the mapping definitions through the "Designer" button, then click "Designer" to edit.
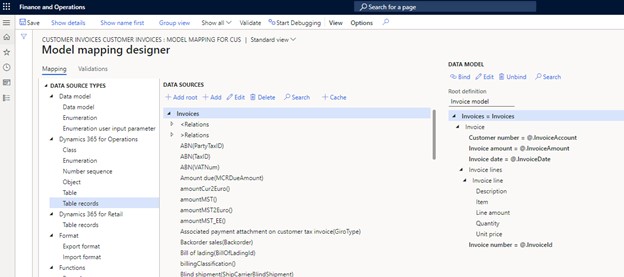
- The designer form presents three sections: available data source types, selected data sources, and the defined data model.
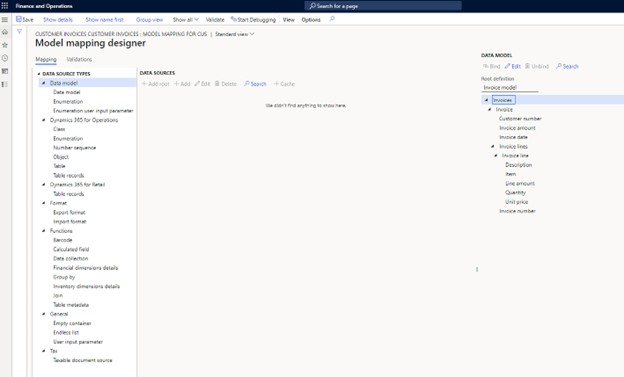
Adding Data Sources:
- Start by adding the customer invoices data source.
- Choose "Table records" from the Data source types.
- Click "Add root" in the Data Sources section.
- Name the data source (e.g., Invoices) and specify the table (CustInvoiceJour).
- Optionally set parameters like cross-company or query selection; choose "Ask for query" for now.
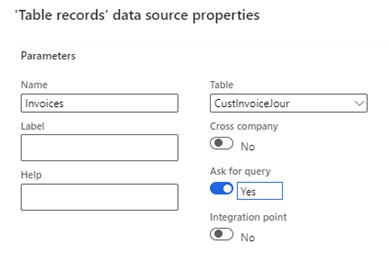
Mapping Fields:
- Select the "Invoices" data source, then bind it to the Invoices node in the data model.
- Expand the "Invoices" data source and locate "Invoice account"; bind it to the Customer number field.
- Bind the following fields similarly: Invoice amount to Invoice amount, Date to Invoice date, and Tax invoice to Invoice number.
Line Mapping:
-
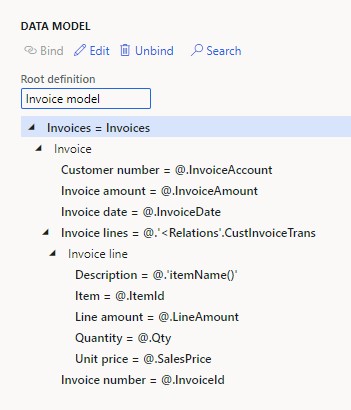
Expand the invoice data source, then navigate to "
- Bind fields from CustInvoiceTrans: Item to Item, ItemName() to Description, Quantity to Quantity, Unit price to Unit price, Amount to Line amount.
Completion and Saving:
- Save the mapping, ensuring all fields are correctly bound.
- Return to the main configurations form.
- Select the model mapping, and mark its status as "Complete" as with the data model.
- Additional Configuration:
- If multiple mapping configurations exist, designate one as the "Default for model mapping."
How to create a format?
For Format configuration, you can follow the steps below:
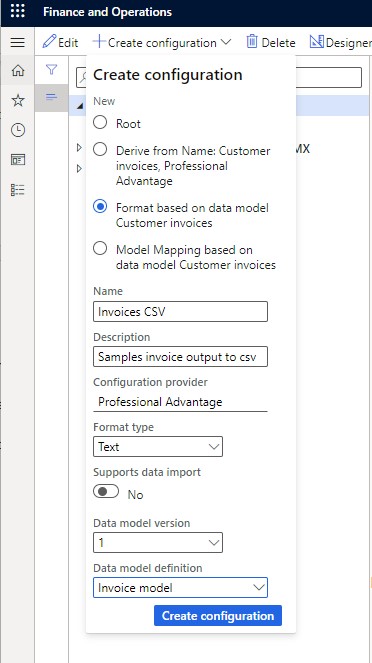
- Ensure the data model (Customer invoices) is selected, not the model mapping.
- Click "Create configuration" and choose "Format based on data model Customer invoices."
- Name it (e.g., "Invoices CSV"), provide a description, select format type (Text), data model version, and definition.
- Leave "Supports data import" off.
- Click "Create configuration."
Designing the Format:
- Select the new format and enter the designer.
- Two columns are visible: left for the output format, and right for the data model, which is currently empty.

Setting up Format:
- Use the tabs (Format, Mapping, Transformations, Validations) to configure; focus on Format and Mapping.
- Activate the Format tab to define the output file format.
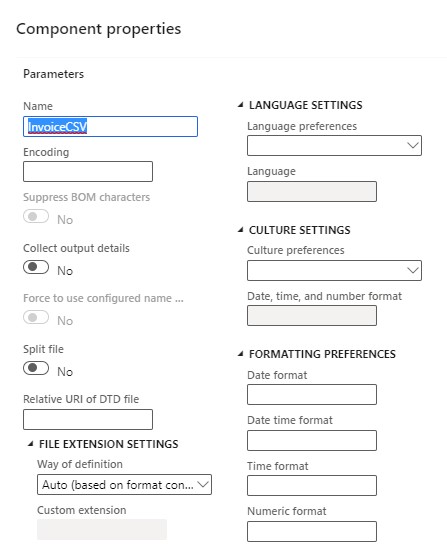
- Click "Add root," choose File, and fill in the required properties.
- Add a "Sequence" named "Content" for repeating elements; set the delimiter as "New line."
- Plan the structure; for example, a header record followed by line records for each invoice.
- Add a Sequence named "Header" under "Content" with a custom delimiter (e.g., comma).

- Within the "Header," add fields like Type, Customer number, Invoice number, Invoice date, and Amount.
- Customize properties for date and amount fields, adjusting format options.
- Create the same fields for line items under "Invoice Lines."
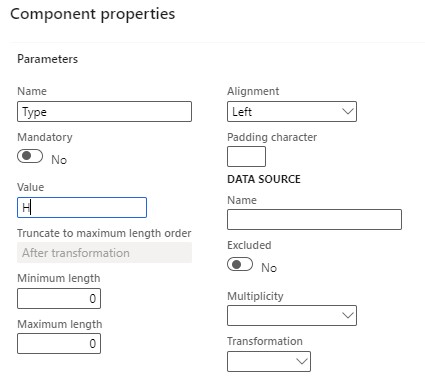
Mapping Fields:
- Switch to the Mapping tab; properties change to display the data model.
- Specify sequences corresponding to record lists (e.g., "Content" matches "Invoices").
- Bind sequences like "Invoice lines" to their respective counterparts in the data model.
- Bind fields for header and line items, except for "Type" fields already filled as "H" and “L”.
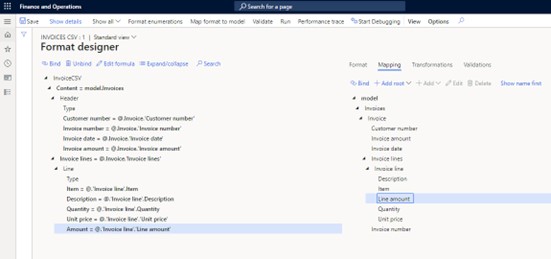
Testing:
- Save the format to preserve your work.
- Test the format by running.
- Select records to include (as set up in the model mapping), then click "OK."
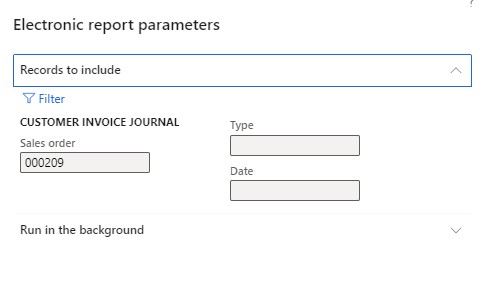
Result:
- A file containing structured data according to the defined format will be downloaded.
- Format Testing:
- Verify the downloaded file for correct structure and data integrity.
Get Started
Now, you have a detailed process from the starting point of model mapping to configure formats. So, you know that reporting tools like these are a necessary part of your daily operation to generate the report simply. If you need more assistance and professional guidance for implementation and navigation, DHRP has Microsoft-certified experts.


