“ Electronic Reporting for Finance and Supply Chain using Dynamics 365 (PART2) ”

As we discussed in Part 1, Electronic reporting has become a need for companies. We have realized that this amazing function extends beyond report generation. 

It allows for data exchange, such as importing bank statements or exporting data for external usage. We talked about the basic components and the way ER works with Dynamics 365 for finance and supply chain. 

As we continue to part 2, we will be talking about further technical details on data mapping and working on the model mapping in it. Excited to learn? Let’s dive in!

We talked about the data model, but we didn’t discuss the creation of the model. Here we are going to talk about the way to create a model.

How to Create a Model?

A single data model component can support numerous hierarchies of domain-specific business entities, as well as Dynamics 365 mappings that enable data flow for reports during runtime. 

ER allows you to create tailored reports that fit unique business demands and regulatory requirements. The data model component’s unparalleled versatility and adaptability enable precise data administration and reporting.

1
In the Electronic reporting configurations form, click on “Create configuration”.
2
Select “Root” and give it a name (e.g., “Customer Invoices”) and optionally a description.The provider will be filled in automatically based on your active configuration provider. Make sure you have this set up as described above.
3
Click “Create configuration” at the bottom of the dialog.
Create Configuration
4
A new root configuration will be created. Click on the "Designer" button on the toolbar to open the designer form for this model.
Designer
Electronic Reporting
5
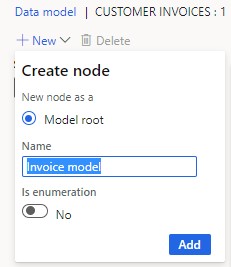
 Click on the “New” drop-down to create a new model element. As this is an empty model, there will only be one option: “Model root”. Give the root node a name that describes the entire model (e.g., “Invoice model”) and click “Add”.
Create-Node
6
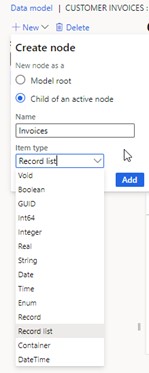
With the top node selected, click “New” again and select “Child of an active node” and give it a name. This node will define the list of invoices, so call it “Invoices”. Select the item or data type drop-down and select “Record list”.
Record List
7
Select the Invoices node and click “New” again. This time select “Child of an active node”, select the item type of Record, and give it the name of the invoice.
8
Add header target fields by clicking “New” again and selecting "Child". Give it a name and select a type.
9
To create invoice lines, create a Child from the Invoice node with the data type “Record list” and name “Invoice lines”.
Invoice Lines
10
Repeat steps 8 and 9 to create invoice line fields.
Invoice Lines
11
11.   Save your model.
12
Change the status to “Complete” using the Change status button.
Complete
Complete 1
Electronic Reporting for Finance

Other Components of Electronic Reporting and their Configuration

We already talked about the root nodes and data model. Let’s move on to the Model mapping and Format configuration process in Detail. 

Model Mapping

A data model component in ER describes the business target entity and attribute mappings along with the items needed to fulfill a certain reporting requirement. 

Model mapping connects these data model components to the necessary application data sources in Microsoft Dynamics 365 Finance and Operations, such as tables, fields, and views.

You can create and also opt for selecting mappings on a multiple level for various purposes and might refer to different areas of the data model.

In our example, we will develop a basic field mapping in Dynamics 365 that will connect our invoice header and lines to the customer invoice tables in Dynamics 365.

Create a model mapping

The data model is about the mapped entities and the source data in Dynamics 365 using the model mapping tool.

1
In your data model, click "Create configuration" and choose "Model Mapping."
2
Name your mapping and select the data model. Click "Create configuration" again.
3
Click "Designer" and select "Add root" under "Data Sources."
Model Mapping
Model Mapping Designer
4
Name your data source  field(e.g., Invoices) and set the table to "CustInvoiceJour." Choose "Ask for a query." Click "OK."
5
Name your data source  field(e.g., Invoices) and set the table to "CustInvoiceJour." Choose "Ask for a query." Click "OK."
Invoices
6
Bind specific invoice fields (account, amount, date, invoice number) to their corresponding data model fields.
7
Expand "Invoices" and "," then bind "CustInvoiceTrans" to "Invoice lines" in the data model.
8
Bind invoice line fields (item, description, quantity, unit price, line amount) to their data model fields.
Data Model
Data Model 1
9
Save your Mapping

Format

The format component is defined as the structure and content of the runtime output file or the structure and content of the runtime imported document. It describes the data items that must be included in the output or incoming file, as well as the formatting and validation procedures.

The format component, in conjunction with the data model and model mapping components, defines the overall process for creating or processing electronic documents. 
How to Create a Format?

The format component is defined as the structure and content of the runtime output file or the structure and content of the runtime imported document. It describes the data items that must be included in the output or incoming file, as well as the formatting and validation procedures.

The format component, in conjunction with the data model and model mapping components, defines the overall process for creating or processing electronic documents. 

1
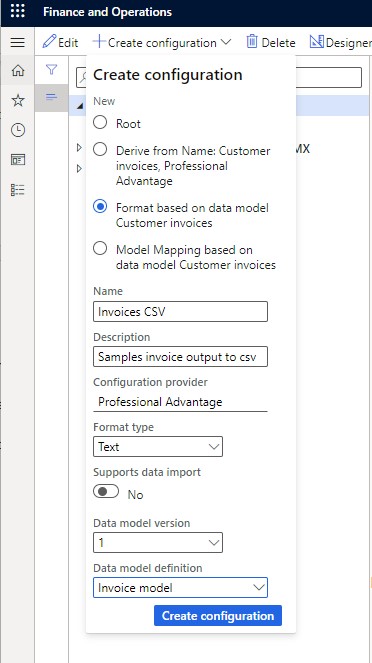
Select the "Customer invoices" data model.
2
Create a new format named "Invoices CSV" (text type).
How-to-create-a-format
3
 In design, define the output structure with a "Content" sequence (new line delimiter).
Format Designer
Format Designer 1
4
Create a "Header" sequence within "Content" (comma delimiter).
5
Create a "Header" sequence within "Content" (comma delimiter).
6
Create an "Invoice Lines" sequence within "Content" (new line delimiter).
7
Create a "Line" sequence within "Invoice Lines" (comma delimiter).
8
Add line fields (Type: "L", Item, Description, etc.)
Component Properties
Component Properties 2
Component Properties 3
Component Properties 4
9
Save format.
10
Switch to the "Mapping" tab and bind sequences/fields.
11
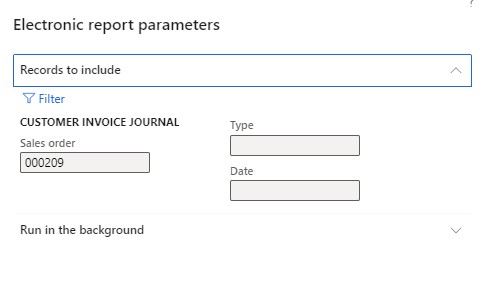
Save the format and run the test (optional: select records).
12
Download the generated CSV file
Electronic-Report-Parameters

Bottom Line 

Electronic Reporting is a magnificent tool offered by Microsoft Dynamics 365 Finance & Operations for businesses. Its no-code capabilities, customization, and flexibility make it an exclusive tool that everyone can work with. We hope this comprehensive guide has given you a taste of what electronic reporting can do. 

There are many more options to explore, including calculations, advanced record operations including grouping, controlling output destinations, business documents, and using ER for importing data and it is a long topic, maybe for some other time. 

As for now, if you want to begin the use of electronic reporting using Dynamics 365, let the DHRP team help you with it. Reach out to get started today.

dhrp team bottom line

INTERESTED

You consent to the processing of your personal data by clicking on the button. Terms of Use

HR & Payroll Software For Finance

Download Template

You consent to the processing of your
personal data by clicking on the button.
Terms of use.

Download Template

You consent to the processing of your
personal data by clicking on the button.
Terms of use.

Download Template

You consent to the processing of your
personal data by clicking on the button.
Terms of use.

Download Template

You consent to the processing of your
personal data by clicking on the button.
Terms of use.

Download Template

You consent to the processing of your
personal data by clicking on the button.
Terms of use.

Download Template

You consent to the processing of your
personal data by clicking on the button.
Terms of use.

Download Template

You consent to the processing of your
personal data by clicking on the button.
Terms of use.

Download Template

You consent to the processing of your
personal data by clicking on the button.
Terms of use.

Join The Team

You consent to the processing of your
personal data by clicking on the button.
Terms of use.

Download Template

You consent to the processing of your
personal data by clicking on the button.
Terms of use.