")


")

")
")


")


Power Apps, Microsoft’s low-code platform, allows users to quickly and effectively create business apps, regardless of their coding skill level. Low-code solutions, such as Power Apps, are increasingly gaining popularity in a world where flexibility and speed are critical for corporate success. Why? They enable teams to build, implement, and improve apps without relying heavily on developer resources.
Previously, we explored how to generate and download PDFs directly from PowerApps forms and how to build a responsive modern gallery in PowerApps. We also explored 3 new modern screen templates in Power Apps. Now, let’s dive into creating a custom approval dashboard in PowerApps.
These platforms reduce development costs, accelerate time-to-market, and enable rapid change adoption. Microsoft Power Apps enables businesses to quickly and easily construct scalable, secure solutions, whether they are digitising manual procedures or improving internal Workflow automation in Power Apps.
Similar to this, if you are having trouble with the current approvals dashboard, you can now go beyond Power Automate’s default interface by creating a custom approval dashboard.
Why Build a Custom Approval Dashboard?
A few restrictions apply to the standard Power Apps Dashboard:
- Only displays the initial 50 approval tasks.
- Lacks sophisticated filtering and server-side sorting.
- Only the first 50 records can be found using a basic search.
- Responding to tasks within the app is not directly integrated.
We’ll create a Power App that fills in these gaps by retrieving up to 100 approval tasks.
- Supports sophisticated filters and server-side sorting.
- enables users to search, reply, and even leave comments within the application itself.
- Enhances scope control by supporting environment selection.
- Responding to tasks within the app is not directly integrated.
How To Build An Approval App In PowerApps
Here are the steps to create a custom dashboard in Power Apps:
Step 1: Understanding the Approval API Endpoint
We must first examine the network activity on the Power Automate approval dashboard in order to retrieve approval tasks.
How to Inspect:
- Open Power Automate
- Go to the Approvals.
- Choose the Inspect > Network tab by performing a right-click anywhere.
- Look for network calls associated with “approval” after refreshing the page.
You’ll find a call to an endpoint.
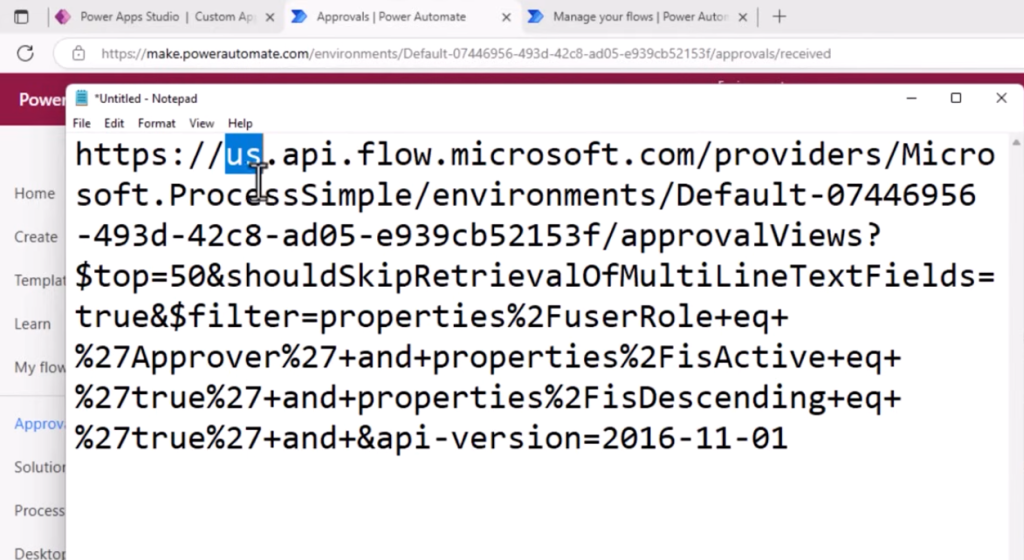
Key query parameters:
- top=100 – to increase the record limit.
- isDescending=true/false – to sort by creation date.
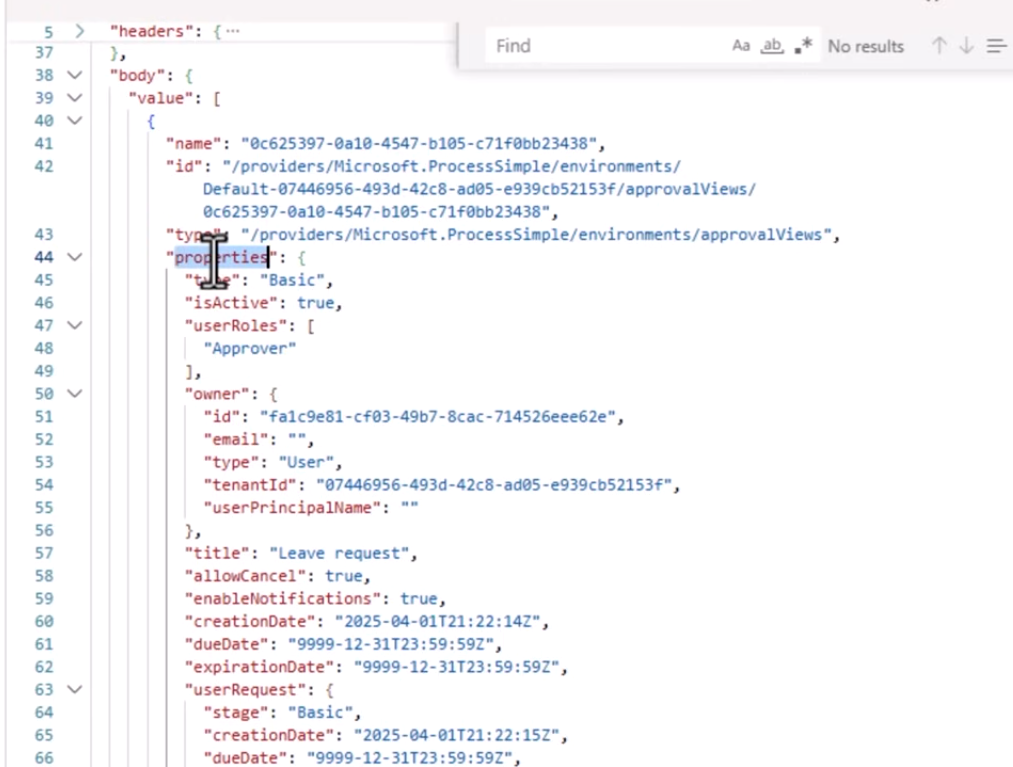
- This GET request returns a JSON array (value[]) of approval tasks.
Step 2: Connecting Power Apps to the Approval API
We’ll use the HTTP with Microsoft Entra ID (formerly Azure AD) connector to access this API.
- Steps: Select Data > Add data in Power Apps.
- Choose HTTP using your Microsoft Entra ID (Preauthorized).
Set up:
- URL of the Base Resource: https://api.flow.microsoft.com
- URI for Azure AD Resources: https://service.flow.microsoft.com
- Enter your Microsoft login information to log in.
Note: Power Apps premium licensing is required for this step.
Step 3: Writing the API Call in Power Apps
Example Setup:
Make a button and set its OnSelect property to:
					Set(varApprovalResponse,
    HTTPwithEntraID.Invoke(
        "GET",
        "https://us.api.flow.microsoft.com/providers/Microsoft.ProcessSimple/environments
        /{environmentID}/approvalViews?top=100&isDescending=true&api-version=2016-11-01"
    )
);
The varApprovalResponse variable now contains the raw API response.
Step 4: Transforming the Response Data
Since Power Apps doesn’t inherently understand the structure of the API response, we’ll parse the JSON using ClearCollect() and ForAll().
					ClearCollect(
    colApprovals,
    ForAll(
        varApprovalResponse.value,
        {
            Title: Text(ThisRecord.properties.title),
            CreatedOn: Text(ThisRecord.properties.createdDate),
            ApprovalID: Text(ThisRecord.name),
            RequestedBy: Text(ThisRecord.properties.requestedBy.displayName),
            ResponseOptions: ThisRecord.properties.responses
        }
    )
);
Ensure all field names exactly match the API response structure (case-sensitive).
Step 5: Displaying Approval Tasks in Power Apps
Use the modern table control to display your collection:
- Set the Items property to: colApprovals
- Choose fields like:
- Title
- CreatedOn
- RequestedBy
You now have a dynamic table of approval requests with up to 100 records.
Step 6: Implementing Sorting & Filtering
Add dropdowns or buttons for sorting and filtering. Update the API call URL dynamically using the user’s input:
					Set(
    varSortDirection,
    If(dropdownSort.Selected.Value = "Descending", "true", "false")
);

Set(
    varAPIUrl,
    "https://us.api.flow.microsoft.com/providers/Microsoft.ProcessSimple/environments/" &
    dropdownEnvironment.Selected.Value &
    "/approvalViews?top=100&isDescending=" & varSortDirection & "&api-version=2016-11-01"
);
Then call the API again with the new varAPIUrl.
Step 7: Responding to Approvals from the App
Display a panel or form with response options when a user selects a row in the table.
For instance, include a comment box, a submit button, and a dropdown for the response type (Approve or Reject).
To send the user’s response back to the system, use the Power Apps HTTP connector or Power Automate flow. Typically, this entails using the approval ID and chosen response to call a different POST endpoint.
Step 8: Bonus Features
- Environment Picker: Provide a dropdown menu for users to choose between environments.
- Date Filter: Sort approvals by pending time or creation date.
- Response Filter: Display only items that are pending, approved, or rejected.
- Duration Calculation: To display the length of time an approval has been pending, use Power Apps formulas:
DateDiff(DateValue(CreatedOn), Today(), Days) & " days pending"
Conclusion
Custom Approval Dashboard for simple Power Apps customisation gives you more flexibility and control over how approval workflows are managed. Using premium connectors to integrate Power Automate’s API with Power Apps, you can: Retrieve and show more data.
- Make sorting and filtering easy to use.
- Allow users to complete approval tasks within the application itself.
- Adapt the experience to the environment and the user.
While it may require some initial setup, the result is a powerful internal tool that scales with your business. For tailored support, DHRP’s PowerApps implementation services and Power BI consultation are here to help you every step of the way.
Do you need to know more? Once you reach the custom steps, Microsoft Power Platform consultants at DHRP can guide you through them.